Posts

Showing posts from December, 2011

Day 8 - Steampunk Goodness!

Image
Here's my low key version of steampunk.  I really don't have any steampunk stamps...so this one sent me digging in my stash and pulling boxes and boxes of stamps out of the closet.  By the time I got through tonight I only had a little area big enough to lay the tag left to work in.   But it's all cleaned up now! I cut the big gear out with cardstock the Cricut from the Accent Essentials cartridge. The little gears is from the Artful Muse Textures Trades.  I used Hero Arts Embossing Powders and made them look like rusty metal.  All the stamps are from Just For Fun except for the spatter stamp and it is from Imaginations and I have had it for years. It is my most favorite stamp and I would be lost without it.  I used a portion of a 7Gypsies ticket and stapled it at the top using my version of the tiny attacher that I've had for years and years.  In fact I still have a BIG supply of the original staples for it too. Tonight's Supplies S
Too Many Late Nights are Catching up with me...

Well, tonight's attempt at making gears and sprockets from chipboard on the Cricut was a dismal failure.  AHHH well, tonight I'll get a good night's sleep and come back and tackle it tomorrow.  I think I'll opt for a heavy cardstock instead and layer it up with pop-dots to give it the dimensional feel. Looking forward to seeing Tim, Ted and Michelle's tags in the morning...and checking out all the kewl blogs and tag inspirations that everyone is posting. Until tomorrow!  Rest well my cyber friends!

Day 7 - 12 Tags of Christmas

Image
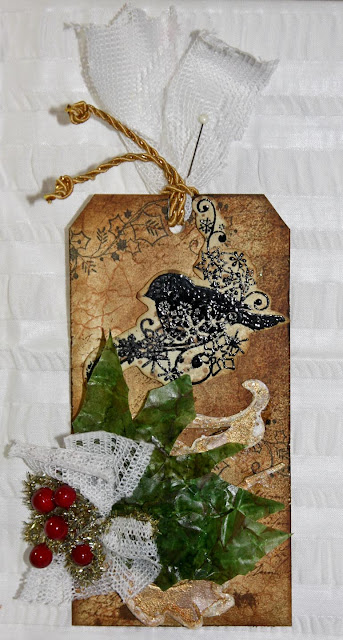
Loving the colors and textures of Day 7!  Again I had to improvise as I didn't have most of the ingredients for this one.  I'm really liking this one, as I love greens and browns. I didn't have any kraft glassine so I used a buff colored Parchment Vellum from Marco Paper and used the Distress Inks.  Turned out better than I thought it would.  The vellum is very crinkly and stiff ...not sure what the glassine would be like as I've never tried it. The vellum worked pretty good for this though. I don't have a holly leaves die...so I freehand cut some holly looking leaves. I inked a tag with Distress inks...well actually it took me 3 tags to get one just the way I wanted it. Tonight's Supply List #8 Tag Buff colored Parchment Vellum from Marco Paper Winter Birds stamps by Inkadinkado Crackle Cube by Stampers Anonymous Script Stamp by Just For Fun Flourish #2 die by Sizzix Gold Cremcoat paint Distress Inks in Vintage Photo

Day 6 - 12 Tags of Christmas

Placeholder for Day 6. I still can't decide how I want to do the metal tag....SO I'll skip if for now and come back to it.

Day 5 - 12 Tags of Christmas

Image
I'm really loving the look of the snowflake stamps and die cuts.  Don't know why since I really don't like the cold or the snow and I don't expect to see any here in Central Florida any time soon! Something about Snowflakes gives me that cheery Holiday feeling. I still didn't manage to catch up tonight, but at least I am not getting any further behind!! Not a big list of supplies tonight, as it did not take a lot of different supplies to make this one. Clear plastic packaging, cut into a tag and white gloss cardstock cut into tag shape to be layered under the plastic tag. Adirondack Inks: Butterscotch, Cranberry, Wild Plum and Lettuce Black archival inkpad.  (Forgot to put the inkpad and a couple of inks in the picture) Snowflake stamps from Just For Fun...and I forgot to put the largest one in the shot. Glossy Accents Brass  Foil Tape and Brass colored wire. Old gold trims from my stash Lucite Shapes...not sure of the company on thes

Day 4 finished!!! Still trying to catch up!

Image
Whew! Day 4 is done!  This one took me a bit longer as I had to let the Crackle dry.  The Glossy Accents were not quite dry, but they were dry enough to assemble and photograph.  I think I made the layer a bit too thick, but I was trying to speed things along rather than put a couple of thinner layers.  I love the blue and silver! Here are a couple of close- up views. ...and a behind the scenes, in progress shot. ...and now for the supply list! I cut the snowman out of chipboard using the Cricut and the Plantin Font cartridge, building him from circles and shapes and the letter Z!  I don't think he turned out to bad at all! Inks:  Brilliance in Plantinum Planet, Moonlight White and Mediterranean Blue.  Distress Inks in Vintage Photo and Old paper (to age the music scrap behind the number 25), and ColorBox in Aqua. Rock Candy Crackle Paint, US ArtQuest mica flakes, US ArtQuest Glossy PPA, 2 largest snowflakes from Just For Fun and one tiny sprinkle one t

Day 3 Complete!!

Image
 I didn't want to fall too far behind, so I was glad to finally have a chance to sit down and work on Day 3.  I didn't have any of the stamps, embossing folders or dies that Tim used...so again I improvised. Tonight products included several Christmas Stamps from Just For Fun Distress Inks in Old Paper and Vintage Photo Adirondack Inks in Butterscotch and Cranberry Brilliance Inks in Green, Blue and White ColorBox inks in Red and Black Glossy Accents and some bling 1/2" hole punch An old jingle bell and some some gold and white twine from my stash  The Flourish was cut with na MFT Flourish Die-namics die and I hand cut the holly leaves from green cardstock.   I dyed some lace with Distress Ink Vintage Photo and used another snippet of juniper from my yard. It didn't take to long to make and I love the simplicity of it. I was still been able to keep up with Mario and his Behind the Scenes posts while I worked AND I made my own little b

Busy, Busy Weekend - with no time to play!

Image
Had LOTS to do this weekend so I didn't get to sit and play as much as I wanted.  I did go out shopping and used some Bonus Cash Coupons from Michael's and got another storage cube to add to my space and a few other little odds and ends.   I was hoping for a Tim Holtz die or two but the ones I wanted were out of stock.  Instead I borrowed my sister's Cricut Expression, the Craft Room software and the Plantin SchoolBook Font Cartridge I recreated the Snowman Alterations Die.  Don't think I did too bad!!  Now to see if I can play some tonight and try to catch up a bit.  I still need to do a tag for Day 3 and Day 4 and it already time for Behind the Scenes for Day 5.  ACKK!!!

Day 2 - 12 Tags of Christmas

Image
Didn't have a Reindeer die...went with one of his alternative tags ideas and made some snowy pines. Day #2 Supplies Inks: Brillance White - Color Box Aqua - Color Box Greenery - Distress Ink Antique Photo Stamps - Pine Tree and Pine Branch by Just for Fun Glossy Accents, White embossing Powder White Pinata Paint, White Brilliance re-inker White Scribbles Paint, Sheet Music Shimmering H2Os Shimmering Mist in I-Gold Gold Ribbon and Burlap for trim, Grunge Board scraps for snow No Hammer snaps

Day 1 - 12 Tags of Christmas

Image
I'm trying to play along with Tim Holtz and his 12 Tags of Christmas.  Here's my go at Day #1 Here is my version of Day 1 of Tim Holtz’s 12 Tags of Christmas. I didn’t have any of the things he used, but I think I managed to improvise fairly well. This is what I used to recreate Tim Holtz 12 Tags of Christmas - Day #1: H2O's Shimmering Mists in Golds, Sky Blue and Irish Mist, Ceramcoat white acrylic paint, light blue Carnival card stock, green card stock, ... Tim Holtz Grungeboard alphabet, old sheet music, pinecone and berry trim that I've had forever, Sizzix snowflake die and snowflake embossing folder. Antique Photo Distress Ink,  All Night Media Satin Pearl embossing powder and MFT Flourish Die-namic. I dyed some white lace with the shimmering mists, dug in my stash for a couple of  glass baubles and picked a sprig of juniper out of my yard. WHEW LOL I think that lists everything I used. OH...I used the Vagabond and Cuttlebug to c